I was prompted to write this after a recent question on Judo forum and having seen so many beginners struggle with this all the time.
We’ve all been there moving uchikomi/ nagekomi time rolls around and you all form up at one end of the mat and then move down the mat in lines turning in for techniques. You look over at the black belts and they’re all spinning in and out of throws with perfect coordination, whilst your attempts could be generously described as resembling a frog in a blender.
So how do you go uncoordinated muppet to slick Judoka?
There are some simple steps, the first is to take control.
All credit for the excellent images of Okano sensei go to Bythesea of Judoforum.com.
All credit for the excellent images of Okano sensei go to Bythesea of Judoforum.com.
Taking control
‘Judo is like dancing’ is an oft quoted phrase, however, it is true in many circumstances. I couldn’t dance my way out of a paper bag as my girlfriend so often reminds me. However, I know one thing that in dancing that one partner is supposed to take the lead.
A common problem with beginners practicing moving uchikomi/nagekomi together is that there is quite a bit of mis-stepping and no clear proper rhythm is established, this makes it very hard to do. A common example of this is when tori advances with his left and uke retreating with his left instead of uke retreating with his right.
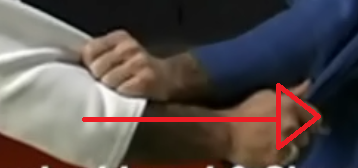
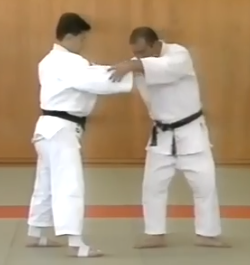
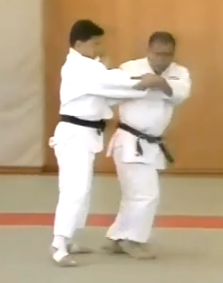
In order to take control of the movement pattern. You first advance with your left foot, assuming a right hander, and pressure directly forward and past uke with your hikite/sleeve grip.
Like so:
This imparts impetus to uke and ensures they step back with the correct foot and puts you in control of the movement.
When retreating instead of pushing on the hikite/sleeve arm, tori pulls.
Space
Many beginners, because they associate being close to uke with being able to throw successfully, because in randori they get stiff armed and held out and are left unable to throw. Translate this into moving uchikomi/nagekomi and so always move very close to uke, this is disastrous for practicing.
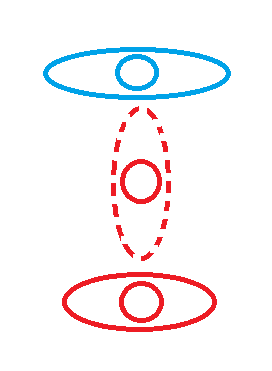
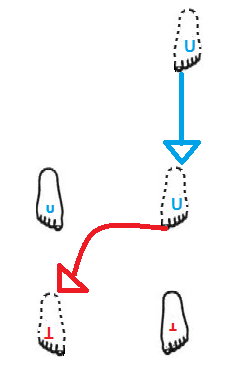
There must be at least room for your body turned lengthways between you and uke.
Tori indicated in red and uke in blue
So when you commence moving uchikomi/nagekomi extend your arms fully and use that as a guide for how far away your body should be. Being too close will totally kill your ability to turn in correctly and wreck your practice.
So once you have taken control over the movement and achieved correct spacing its time for the actual movement pattern.
Moving when retreating
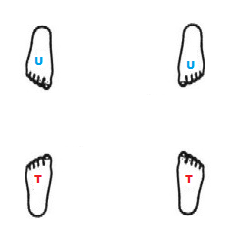
We begin like so
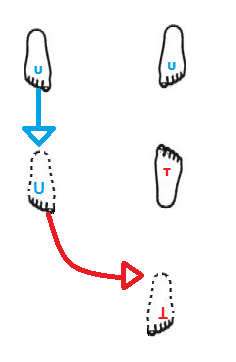
Then tori retreats with his left foot, indicated by the red line, which causes uke to advance, indicated by the blue line.
In a stylized/demonstrative form it would like this
Tori then brings his right foot level with his left foot and uke advances with his left foot to be level with his right foot. Tori’s movement indicated by the red lines, uke’s by the blue lines
Here is the movement shown in full.
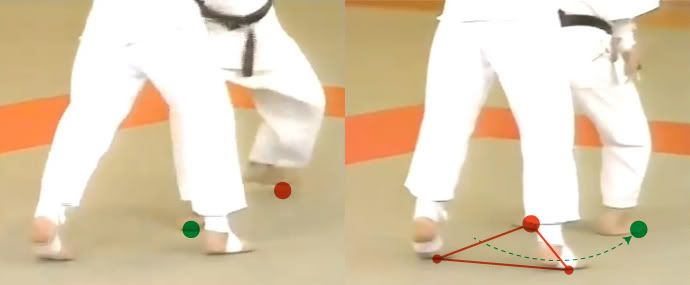
Tori observes the triangle concept thus, green indicates toris’s movement and red the triangle
Moving when advancing
Throwing an uke when tori is advancing and uke is retreating is a very difficult skill and require a good uke and competent tori. There is an elite ninja, super secret method of doing this that I will detail in my forthcoming FOJ Dynamic Delay thread that I will publish when I‘m finally happy with it.
However, for now I will show the commonly taught hikidashi version.
Tori advances as uke retreats
Then bring his trailing foot into place
The sequence looks like this, the triangle concept illustrated in red, click to enlarge.
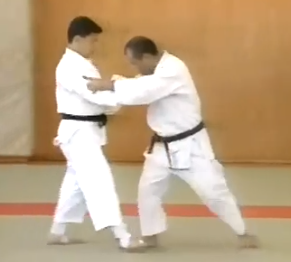
In action in a moving sequence it looks like this
. However, it is important to mention that 50% of drilling is the uke and if your uke doesn’t know how to move in a cooperative way then you’re wasting your time.
If everytime you try and perform moving uchikomi/nagekomi when retreating and your uke takes a massive clonking forward step as you try and turn in and wrecks your throw, then:
IT IS THEIR FAULT NOT YOURS
The same applies for when throwing or entering on an uke when they’re retreating. If they don’t bring their feet together to give you an easy triangle upon which to enter.
IT IS THEIR FAULT NOT YOURS
The remedy to this situation is to talk to your coach and communicate with your uke to try and remedy the situation.
Hopefully this has prove helpful and useful to you and will help improve your drilling


This should be a main chapter in every 'Judo for beginners' book out there! It's one of the basics for successful judo and far more important than learning the entire gokyo... I work as a coach in several clubs and on different levels and I encounter crapy ukes almost every day. Very frustrating for everbody and it just takes ages to teach them proper movement if the haven't learnt it from the beginning.
ReplyDeleteKeep up the good work! I'm impatiently waiting for further articles!
Thank you so much for the article. It really makes a lot of sense! I get why I can't throw people now. I was wondering how you would do tai sabaki on the outer gate. Is there anyway to still use functional judo principle if you require to position yourself outside of his elbow at maybe 3, 9, 5, or 8 o'clock to uke?
ReplyDeleteThanks that was an jaw-droppingly good read.
Great post, much appreciate the time you took to write this
ReplyDelete